Cutting the dovetail joint was probably the scariest part of making the guitar since the playability of the whole guitar essentially hangs on the quality of that joint. I relied very heavily on J. Sevy’s Dove Tail Joint section of his website to guide me through the process. But before I begin describing my experience I want to talk briefly about the neck joint in general, because it was probably the biggest source of confusion I had throughout the construction of the guitar.
An Aside on Action Height
For me personally the action height of a guitar’s strings can either make or break the guitar. If the strings are too high off of the fret board (the action is too high) the playablity/enjoyment factor decrease dramatically. The action height is the distance between the top of a fret to the bottom of a string and it is determined by the height of the strings in the nut and the height of the strings off of the saddle. For some reason I never thought hard about how I was going to achieve a specific action height, it was confusing to me, which is too bad because I’ve had problems getting the action on my guitar low enough. But now that I’ve had some time to think methodically about it it really doesn’t seem all that complicated.
The thing that really helped me to clear things up is the groundbreaking realization that the fret board must be perfectly parallel with the strings and since a string under tension is perfectly straight so must the fret board be (well that’s actually not exactly true, from what I understand it is desirable for the fret board to have a slight concave bent to it so that it melds with the convex shaped envelope of a vibrating string). But if the fret board is to be perfectly straight and the fret board is of a constant thickness and it is to overlay the neck and the sound board from the top of the body to the sound hole that means that the top of the neck and the sound board must lie in the same plane. In other words the angle of the neck joint is predetermined by the angle that the sound board and the sides make, since the fret board must be perfectly flat from its top at the nut to its end right above the sound hole. So then the only variable left in adjusting the action height is to adjust the longitudinal curve of the sound board starting from the sound hole down the bottom of the guitar (of course you could just as easily assume the area of the soundboard from the sound hole down to the bottom of the guitar is your reference and have the variable be the adjustment of the angle of the soundboard from the top of the guitar body down to the sound hole, its all just a matter of reference preference). Hopefully the picture below helps in visualizing what I’m talking about. UPDATE: I was recently watching a video of a tour of the Martin Guitar Factory and thought it worthwhile to note the host of the tour mentioned Martin guitars have a flat soundboard up to the waist and then dive down at a degree and a half angle until meeting the neck, which I thought was nice to hear as confirmation of what I’d written here about curving the soundboard to get a nice low action.
Unfortunately as I said I did not take the time to think about all of this until I was finished building the guitar so I for the most part have a longitudinally flat sound board and the height of my bridge had to be shaved down to near the height of my fret board, which really does not leave enough room to have a properly set up saddle. But now I’ll know better if I ever build another guitar.
The Dove Tail Joint Plans
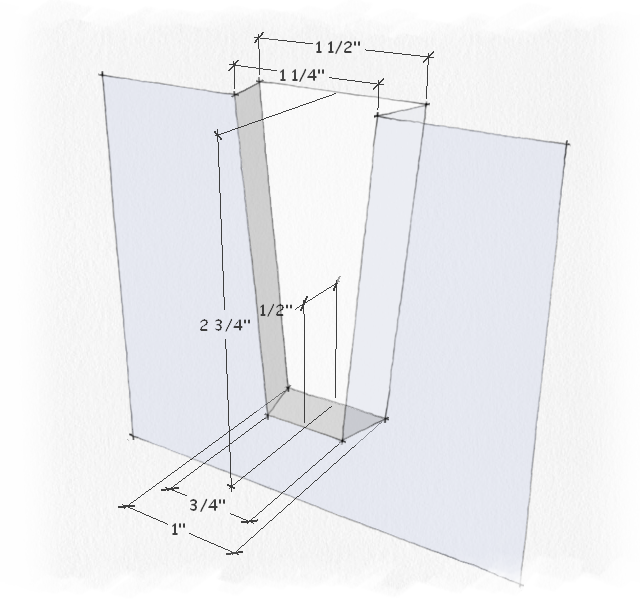
The dimensions I used to cut the joint are shown in the picture below, they come straight from J. Sevy’s website. I only show the body part of the joint. The top of the sound board aligns with the top of the joint.
The Neck Joint
I started by hand planing the body down on the sound board right where the fret board would sit and on the sides where the neck would butt up against as J. Sevy does on his website. I was actually surprised by how well I was able to flatten out the sound board and sides in preparation for the dovetail joint. Next I measured the angle between the top of the soundboard and the side where the neck joint would be using a bevel tool since it wasn’t a perfect 90 degree angle. I then transposed the supplementary angle onto the neck blank and used a chop saw to get a nice smooth cut at the exact angle that I was looking for. The picture below shows the neck angle after the cut was made.
I then marked out the joint in pencil.
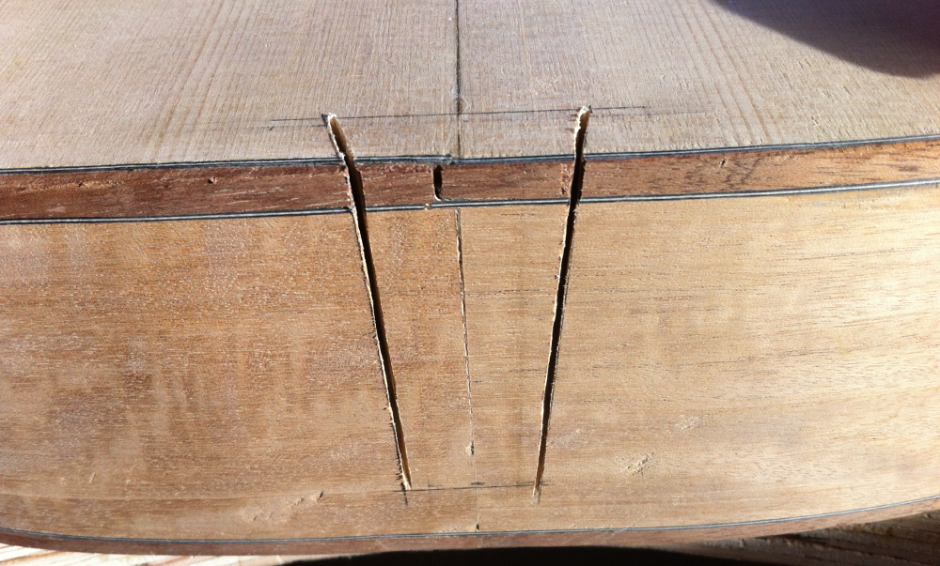
And carefully it out with a dovetail saw.
The Body Joint
With the neck joint roughly cut out I proceeded on to mark out the joint on the body. And its here that I really goofed up big time. Instead of marking out 3/4″ on the bottom I marked out 1″ so that bottom of the joint was essentially useless. Thankfully I was able to glue in some strips of wood and re-chisel out the joint to the proper width. But I didn’t realize my error until later.
And then cut out as much of the joint as I could with a dove tail saw. Have you ever noticed that some of the best things you do in life are mistakes. I was really proud of those cuts until I realized I’d messed up real bad. Its like that with hand writing too. I make some of the nicest looking numbers when I mistakenly write down a number other than the one I was supposed to write down. Its funny. Anyway back to guitars.
I ended up using a router with a dove tail bit to cut out the bulk of the material. I was actually surprised by how well that worked for me. The picture below shows the joint after I’d finished with the router.
I finished carving out the last little bit on the bottom with a chisel and then shortly there after discovered my error for the first time as I tried to fit the neck. Fortunately I was able to save the joint as I mentioned earlier by gluing in some strips of wood and re-chiseling the joint until I got the neck seated so that the top of the neck was flush with the top of the sound board. At this point the joint still needed some adjustment, but I decided to continue on with carving the neck before I did the fine tuning on the joint.
| < Back | The Build Process | Next > |
Planning and Design | Fret Spacing Calculation | Template and Workboard | Building the Neck | Making the Body Plates | Soundhole Rosette | Soundboard Bracing | Bending the Sides | Gluing Sides to the Soundboard | Creating and Installing the Back Plate | Binding the Body | Making the Dovetail Neck Joint | Carving the Neck | Making the Fretboard | Making the Bridge | Creating the Headstock Inlay | Finishing | The End Product


Beautiful work! You said in your writing that the bridge ended up only slightly thicker than the fretboard. That’s focusing on the fretboard completely flat at the transition from the 14th fret over the body. The most important parameter here is the string hight at the bridge location. If you pitch the angle of the neck back with a straight edge on top of the frets it should fall in about 1/32″ over a 3/8″ bridge. This will drive the top more and give you better sound. Cosmeticly you will then have fallaway of the fretboard from the neck joint over the soundboard which is no big deal unless you hang out up there a lot when you play. Some builders even add a small amount of fallaway in this location to help ensure it doesn’t raise with weather or settling and cause a fret buz. If the fallaway is even noticeable visually it wouldn’t bother me and is almost a guarantee on ones first build. The good news is it shouldn’t be to hard to pitch the neck back and swap out the bridge. With all of the hard work you put into making this beautiful guitar I would think it’s worth it.
Best
Wes
Nice. Thanks for the tips! Just might have to try that someday.
Do you take apprentices? I’m an experienced woodworker, but this dovetail joint is really hard. I want to go to luthier school, Roberto-
Venn if I can ever raise the money,$12,000. I’m 64 but not over the hill yet, Your instruction is the best I have found on line. Thanks.
Hi Doug, I like your enthusiasm, I work with a few 60 somethings where I work and they’re also very active, but no I’m no where near the point of taking apprentices. I’m glad you found the content useful!